 Doing pasta at home is one of the most satisfying and rewarding things that you can do in your kitchen. As you know pasta is at the base of Italian cuisine and Mediterranean diet, it is so simple and yet so rich as the possibilities and variations are countless. I think that is the beauty of Italian cuisine: it starts from very simple and basic ingredients that are then declined in amazing different recipes.
Since we are given the gift of time in this strange period of our history, I decided to make pasta at home for the very first time. Yes, even if we are Italians, we usually buy pasta and don’t make it at home from scratch very often. Ravioli is a kind of stuffed pasta, and I went for a very delicate and yet delicious ricotta filling. I really hope you will give a try to this recipe and let me know your comments!
-ITALIAN VERSION-
TORTELLI RIPIENI DI RICOTTA FATTI IN CASA
Ho sempre desiderato fare la pasta fresca in casa e quindi anche io ho deciso di approfittare della quarantena per dedicarmi a questa attività culinaria che ci può dare veramente tanta soddisfazione. Fare la pasta in casa è veramente facile, divertente e soprattutto gratificante. Per me è stata praticamente la prima volta, fatta eccezione per qualche infruttuoso tentativo quando ancora ero solo una bambina, però la macchina per fare la pasta che avevamo all’epoca l’ho conservata, o meglio l’ho sequestrata ai miei genitori e me ne sono appropriata. Essendo la prima volta ho seguito una ricetta base (e tanti tutorial), ma conto presto di studiare alternative senza glutine o anche senza uova, abbiate solo un po’ di pazienza. Quando è arrivato il momento di dare forma ai tortelli sono andata un po’ a istinto, e quindi direi che assomigliano più che altro a dei cappellacci, ma in realtà non sono un’esperta di forme di ravioli, anche perché qua a Brescia si mangiano solo e rigorosamente i cosiddetti “casoncelli”, che spero di poter fare presto. Per quando riguarda invece il ripieno vi assicuro che benché semplicissimo e “povero” è veramente ottimo, la punta di noce moscata e di limone lo rendono veramente speciale. Per completare il piatto ho preferito un sugo semplice, ma che spesso si rivela il migliore: burro fuso e un po’ di salvia, e…buon appetito!
Ingredienti per 2 persone
Per la pasta
2 uova
160 g farina bianca tipo “00”
1 cucchiaino di sale fino
Per il ripieno
100 g di ricotta
30 g parmigiano
salvia, rosmarino e prezzemolo tritati, q.b.
sale e pepe, q.b.
una spolverata di noce moscata
scorza di limone grattugiata, q.b.
Procedimento
-
Disponete la farina a fontana e inserite le uova al centro. Aggiungete il sale e un cucchiaio di olio extra vergine di oliva (opzionale). Mescolate delicatamente con una forchetta, e cominciate ad incorporare la farina.
-
Questo passaggio iniziale può essere anche fatto in una ciotola, oppure in un robot da cucina.
-
Quando il composto non è più liquido incominciate a lavorare l’impasto con le mani. È necessario lavorarla per almeno una decina di minuti. Se siete abituati a lavorare il pane noterete che il tipo di impasto è diverso e, in particolare, più duro, per questo motivo non si può lavorarlo in planetaria. Per cui sarà difficile avvolgerla su se stessa, e i movimenti saranno più piccoli. Io personalmente avvolgo un piccolo lembo e poi schiaccio con il palmo della mano e man mano ruoto leggermente la palla di impasto.
-
Una volta ottenuto un impasto elastico e omogeneo, avvolgetelo nella pellicola e lasciatelo riposare per almeno 30 minuti, per far sì che il glutine si “rilassi”.
-
Una volta riposato, tagliate l’impasto a metà con un tarocco e avvolgete la metà che non utilizzate subito nella pellicola.
-
Assocuratevi che la vostra macchina per tirare la pasta sia ben fissata al tavolo, se avete un Kitcheaid consiglio l’utilizzo dell’apposita sfogliatrice.
-
Infarinate il pezzo di pasta con della farina di semola e cercate di formare una forma rettangolare con il mattarello, poi inseritelo nella macchina per la pasta con i rulli alla larghezza massima.
-
Una volta passata, ripiegarla a libro in tre parti, facendole combaciare il più possibile e tagliando irregolarità ed eccedenze.
-
Poi riducete di una tacca in modo da stingere i rulli e passate nuovamente la sfoglia. Continuare fino ad arrivare all’ultima o penultima tacca a seconda dello spessore desiderato. Per questa ricetta io mi sono fermata alla penultima tacca e inoltre per ogni tacca passo la pasta due volte in modo che diventi più omogenea.
-
Stendete quindi le strisce su un piano di lavoro infarinato e lasciate asciugare per circa 10-15 minuti per lato.
-
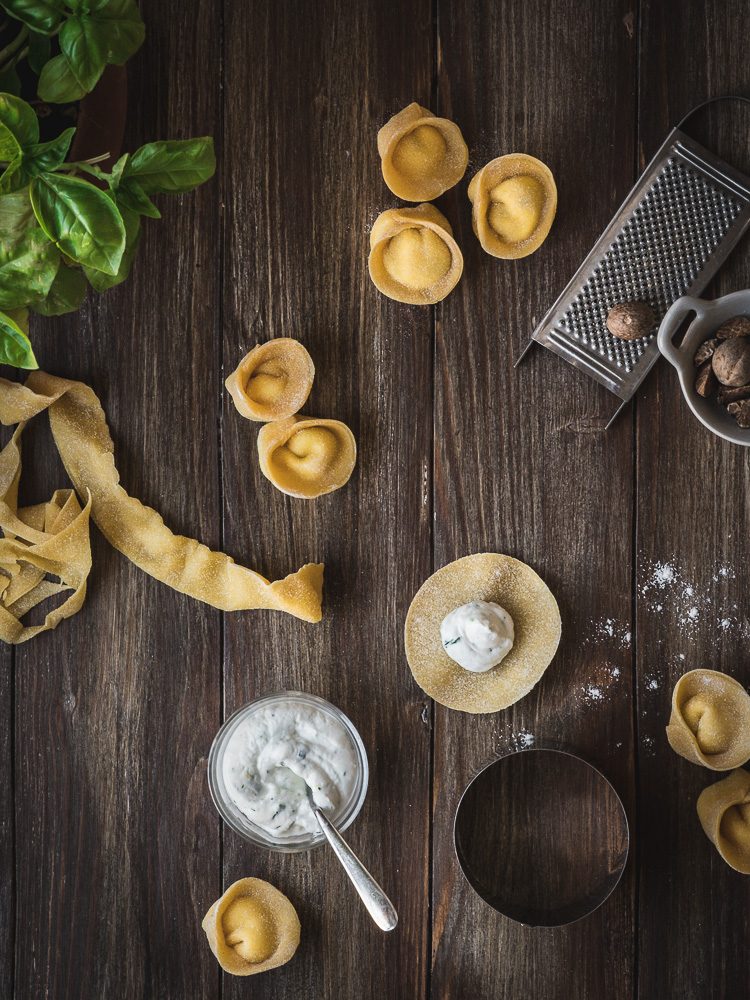
Nel frattempo, preparate il ripieno dei tortelli mescolando semplicemente tutti gli ingredienti in una ciotola fino ad ottenere un composto liscio, poi trasferitelo in una sac-a-poche.
-
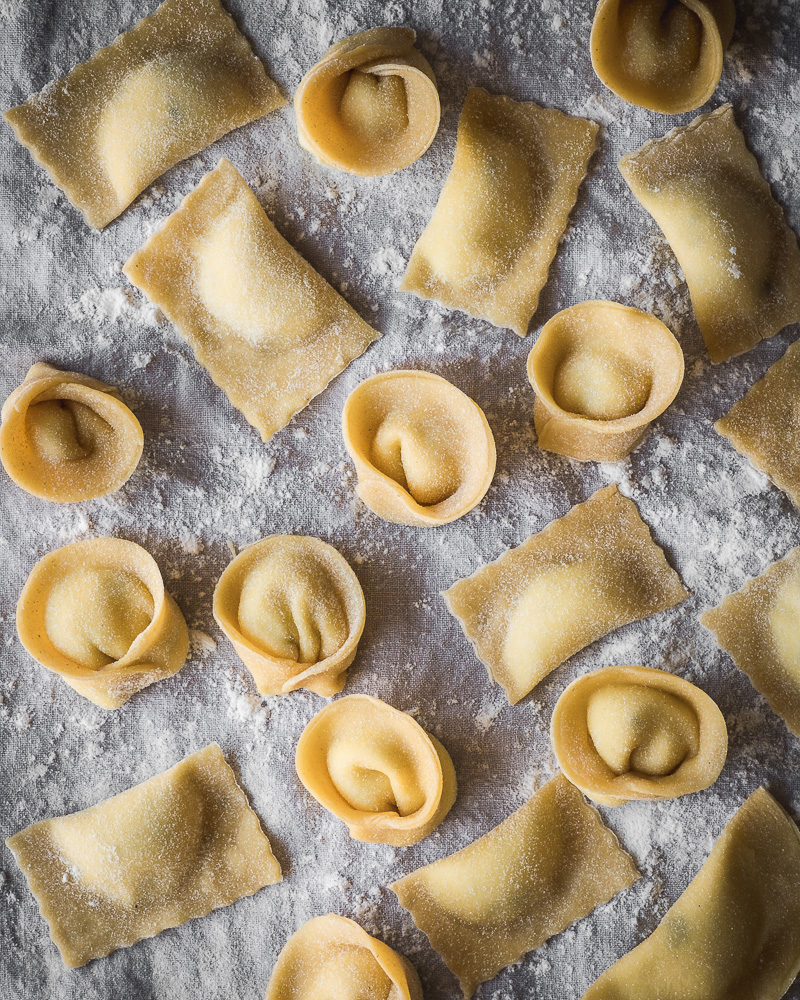
Io ho fatto dei ravioli tondi per cui ho ricavato le forme dalla striscia di pasta con un coppapasta.
-
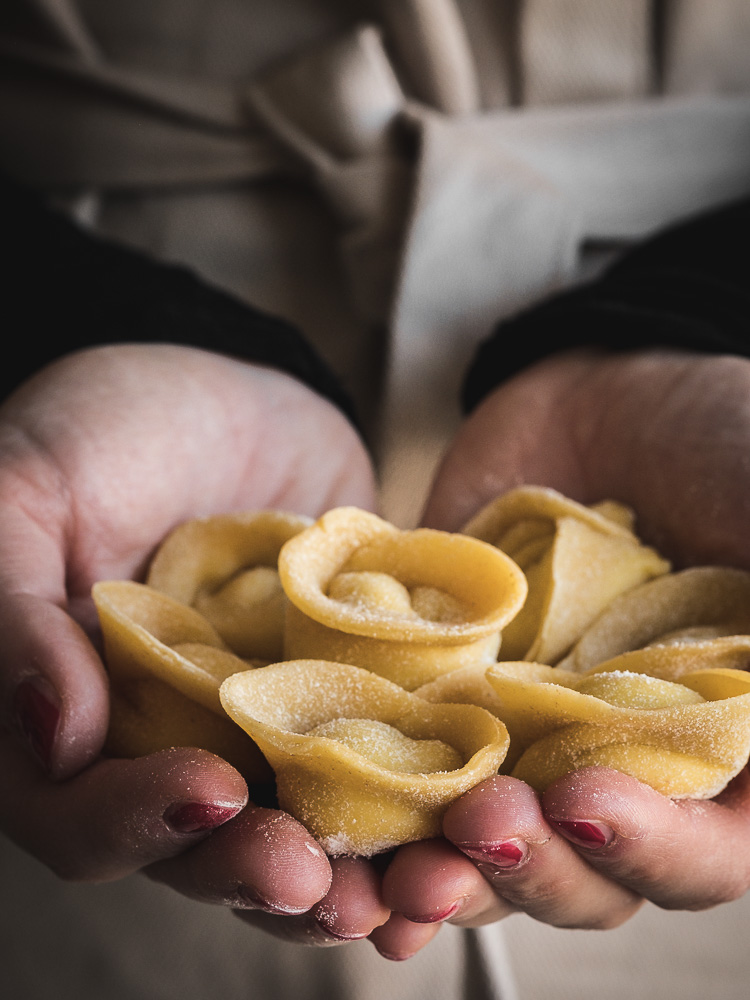
All’interno di ciascuno dischetto ho posto una piccola noce di impasto.
-
Infine, ho chiuso il raviolo facendo aderire bene i lembi e ripiegato le estremità.
-
Cercate di esercitare una leggera pressione con i la punta delle dita quando li chiudete per eliminare l’aria.
-
Disponeteli su un vassoio leggermente infarinato con farina di semola fino a quando non sarete pronti per cuocerli.
-
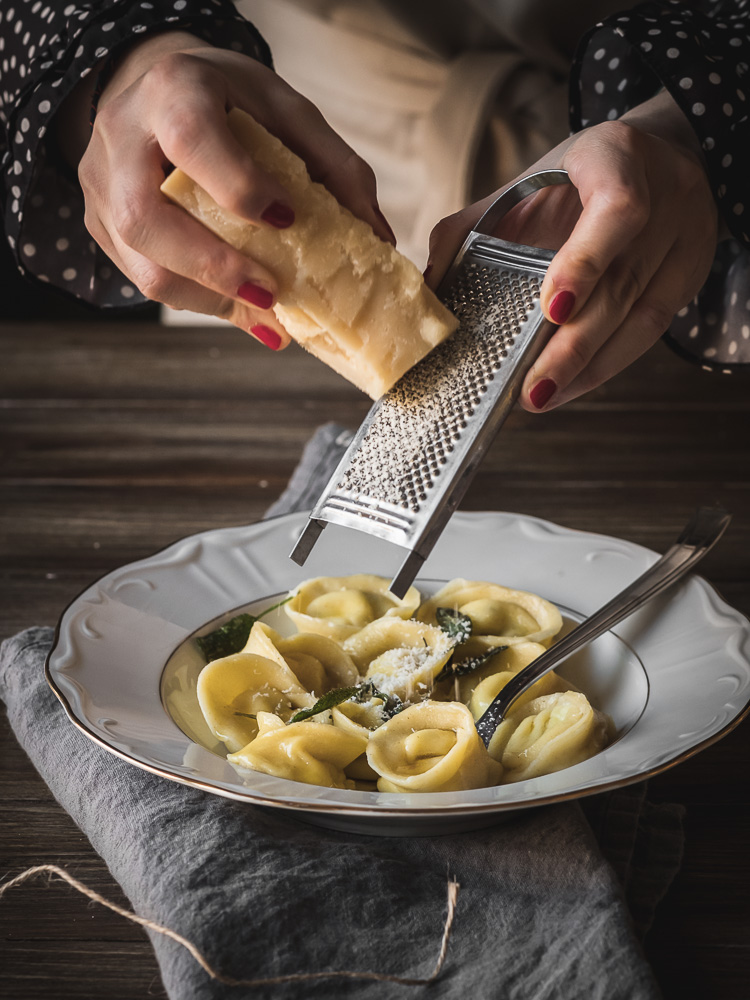
Cuocere in acqua bollente per circa alcuni minuti e condire a piacimento, ad esempio con burro e salvia come ho fatto io.
-
È possibile conservare i ravioli in congelatore per al massimo 1 mese in un sacchetto gelo.
HOMEMADE RICOTTA RAVIOLI
 (No Ratings Yet)
 Loading...
Ingredients
- FOR THE PASTA
- 2 eggs
- 160 g flour type"00"
- 1 tsp salt
- FOR THE FILLING
- 100 g ricotta
- 30 g Parmigiano cheese
- a mix of finely chopped rosemary, sage, parsley,
- salt and pepper
- 1/4 tsp nutmeg powder
- lemon zest
Instructions
1
Place the flour on the kitchen table – or in a bowl – and make a well in the center. Then pour the eggs in the well. You can also do this first part into a food processor.
2
Add the salt and a spoonful of extra virgin olive oil (optional).
3
Stir gently with a fork and begin to incorporate the flour.
4
Keep incorporating the flour into the eggs until all the flour has been absorbed.
5
Once everything is combined start kneading the dough on your kitchen counter for at least 10 minutes. You can’t do this in a stand mixer, as the dough is tougher than bread dough, so you have to do it by hand.
6
After ten minutes, make a ball and wrap it in a cling film, let it rest for at least 30 minutes to allow the gluten to “relax”.
7
After resting, remove the dough from the fridge and cut it into 2 equal pieces. Set aside and cover with a cling film to stop it from drying out.
8
First, make sure that your pasta maker machine is clamped firmly to the table. If you have a kitchenaid stand mixer I strongly recommend the pasta roller attachment as it makes the process easier.
9
Dust your work surface with some semolina flour.
10
Take your piece of pasta dough and press it out flat with the palms of your hands. Roll it through the widest (fully open rollers) setting of your pasta machine.
11
Lightly dust both sides of the pasta sheet with flour and fold it in half. Feed the pasta sheet through the smooth rollers several times, until it is long and regular in shape.
12
Set the adjustment knob of the machine to number 1, and pass the pasta sheet through once more.
13
Repeat the process and so on until you reach the desired thickness. For this ravioli pasta, I stopped at number 6 (being number 7 the last one).
14
Repeat with the other piece of pasta. Then let the pasta sheets dry on a surface dusted with semolina flour for about 10-15 minutes per side.
15
In the meantime, prepare your filling by combining in a bowl all the ingredients and mix well until smooth.
16
As I decided to make round ravioli, I used a cookie cutter to cut out circles. Dip your finger in the bowl of water and run it along the edge of the round to moisten.
17
Place 1 teaspoon of filling in the center of half the circles. Place the second circle on top over the filling pressing out the air from around each portion of filling, then draw the two corners together to form a rounded bonnet-shape, press firmly to seal.
18
To cook the ravioli, bring a large pot of salted water to a boil. Add ravioli and cook for 5-10 minutes.
19
Drain pasta and toss with your sauce, I made burned butter and sage.
Notes
La ricetta è per 2 persone - Recipe for 2 servings
HOMEMADE RICOTTA RAVIOLI
(No Ratings Yet)Ingredients
- FOR THE PASTA
- 2 eggs
- 160 g flour type"00"
- 1 tsp salt
- FOR THE FILLING
- 100 g ricotta
- 30 g Parmigiano cheese
- a mix of finely chopped rosemary, sage, parsley,
- salt and pepper
- 1/4 tsp nutmeg powder
- lemon zest
Instructions
Place the flour on the kitchen table – or in a bowl – and make a well in the center. Then pour the eggs in the well. You can also do this first part into a food processor.
Add the salt and a spoonful of extra virgin olive oil (optional).
Stir gently with a fork and begin to incorporate the flour.
Keep incorporating the flour into the eggs until all the flour has been absorbed.
Once everything is combined start kneading the dough on your kitchen counter for at least 10 minutes. You can’t do this in a stand mixer, as the dough is tougher than bread dough, so you have to do it by hand.
After ten minutes, make a ball and wrap it in a cling film, let it rest for at least 30 minutes to allow the gluten to “relax”.
After resting, remove the dough from the fridge and cut it into 2 equal pieces. Set aside and cover with a cling film to stop it from drying out.
First, make sure that your pasta maker machine is clamped firmly to the table. If you have a kitchenaid stand mixer I strongly recommend the pasta roller attachment as it makes the process easier.
Dust your work surface with some semolina flour.
Take your piece of pasta dough and press it out flat with the palms of your hands. Roll it through the widest (fully open rollers) setting of your pasta machine.
Lightly dust both sides of the pasta sheet with flour and fold it in half. Feed the pasta sheet through the smooth rollers several times, until it is long and regular in shape.
Set the adjustment knob of the machine to number 1, and pass the pasta sheet through once more.
Repeat the process and so on until you reach the desired thickness. For this ravioli pasta, I stopped at number 6 (being number 7 the last one).
Repeat with the other piece of pasta. Then let the pasta sheets dry on a surface dusted with semolina flour for about 10-15 minutes per side.
In the meantime, prepare your filling by combining in a bowl all the ingredients and mix well until smooth.
As I decided to make round ravioli, I used a cookie cutter to cut out circles. Dip your finger in the bowl of water and run it along the edge of the round to moisten.
Place 1 teaspoon of filling in the center of half the circles. Place the second circle on top over the filling pressing out the air from around each portion of filling, then draw the two corners together to form a rounded bonnet-shape, press firmly to seal.
To cook the ravioli, bring a large pot of salted water to a boil. Add ravioli and cook for 5-10 minutes.
Drain pasta and toss with your sauce, I made burned butter and sage.
Notes
La ricetta è per 2 persone - Recipe for 2 servings
No Comments