
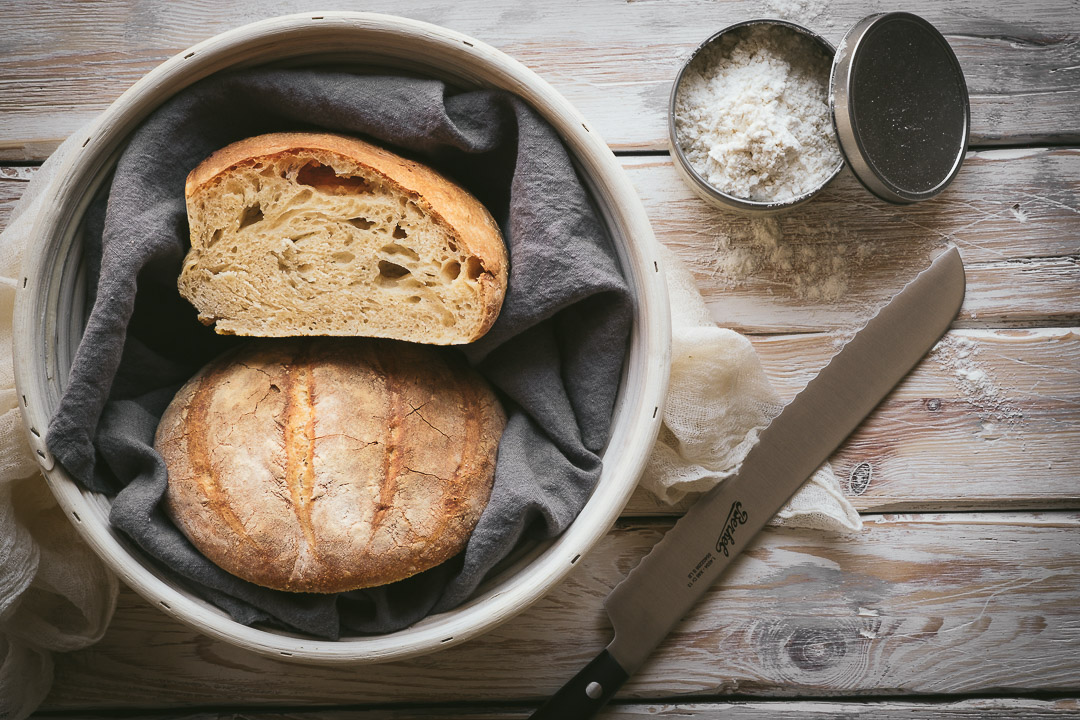
 I am pretty sure that the most searched word on the web in this period is bread! And that’s great! I love the fact that so many people are making bread at home, maybe for the first time in their lives. And this recipe is made especially for those people who want to obtain a beautiful bread but maybe don’t have the skills yet for kneading or sourdough method. Here is the recipe for a super easy no kneading bread made with simple dry yeast, and as you can see from the picture the result is amazing.
The credit for this recipe goes to Vittorio from “Viva la Focaccia”, and you can also check his video on youtube, but they are in Italian. So, below you can find the recipe in English as well. What are you still waiting for? GO make some exceptional homemade bread!
-ITALIAN VERSION-
PANE SENZA IMPASTO CON LIEVITO SECCO
Non c’è bisogno di sottolineare che il pane, e le ricette per farlo in casa, sono il top trend del momento. Ed è una cosa bellissima, mi fa molto piacere che tante persons si stiano appassionando a questa attività che prima evidentemente nessuno aveva il tempo di fare. Il fatto è che ognuno di noi ora vorrebbe ottenere uno di quei bellissimi pani che vediamo su instagram, ma non tutti siamo pronti ad affrontare le ricette più laboriose. Quindi vi propongo una ricetta che personalmente mi ha lasciato senza parole perché permette di ottenere un pane con una discreta alveolatura, e un fantastico sapore, senza bisogno di impastatrice e con del semplice lievito secco. Il merito di questa ricetta non è mio, bensì del mitico Vittorio di “Viva la Focaccia” e dobbiamo veramente ringraziarlo per questa ricetta fenomenale. Come potete vedere dalla foto il risultato è strepitoso, soprattutto se si pensa che bastano veramente 5 minuti per fare questo pane, e non serve nemmeno impastare. Ora non ci sono veramente più scuse, prendetevi 5 minuti e fate il vostro pane!
Ingredienti
340 g acqua tiepida
5 g lievito di birra secco (oppure 12 g di lievito di birra fresco)
455 g di farina bianca tipo “0”, W 240, Proteine 12%
10 g sale
Procedimento
-
Mescolare con una forchetta il lievito con l’acqua tiepida (circa 36° C).
-
Versarci sopra la farina e il sale e mescolare per circa un minuto. Con questa ricetta non è necessario impastare, e non serve nemmeno la planetaria.
-
Dopo circa un minuto otterrete un impasto decisamente grezzo, copritelo con un panno o della pellicola e lasciatelo lievitare fino al raddoppio. Circa un’ora e mezza.
-
Una volta lievitato trasferite semplicemente la ciotola con l’impasto nel frigorifero, e lasciate riposare per almeno 24 ore. Questo impasto si conserva in frigo anche per più giorni.
-
Dopo 24 ore potete procedere a fare un pane grande, oppure due più piccoli. Potete anche utilizzare solo una parte della pasta e rimetter il resto in frigo.
-
Rimuovere delicatamente l’impasto dalla ciotola, formare una palla avvolgendo l’impasto su se stesso, senza lavorarlo ulteriormente. Infarinate leggermente e lasciar lievitare in un luogo tiepido e al riparo da correnti d’aria per circa 45 minuti. Potete già prepararlo sulla teglia che andrete ad utilizzare in cottura.
-
Una volta terminata la seconda lievitazione, incidete la superficie del panetto con un coltello affilato o con una lametta, questi tagli permetteranno al pane di espandersi in cottura. Infornare e cuocere a 225°C per circa 30-40 minuti.
-
Nei primi 10 minuti di cottura è consigliato mettere sul fondo del forno anche un pentolino con dell’acqua bollette che aiuterà ulteriormente il pane a svilupparsi.
-
Sfornare, sistemare su una gratella e lasciar raffreddare.
EASY NO KNEADING BREAD WITH DRY YEAST
 (No Ratings Yet)
 Loading...
Ingredients
- 340 g lukewarm water
- 10 g active dry yeast
- 455 g di flour type "0" (bread flour is fine) W 240, Protein 12%
- 10 g salt
Instructions
1
Mix the yeast with lukewarm water (36°C) and whisk it with a fork.
2
Add flour and salt, mix well for about a minute. It is not necessary to work the dough or use a stand mixer.
3
You will obtain quite a rough dough but it is ok, there is no need to knead it.
4
Cover with plastic wrap and let rise in a warm place until doubled in size, about 2 hours. You can let it rise into the oven with only the light on.
5
Once doubled just put your container into the refrigerator for at least 24 hours. This dough can last for many days and it will become even better if you let is "rest" more time.
6
When you are ready to make your bread, just take the dough out of the fridge, flour your hands and gently shape the dough into a round ball.
7
You can use all the dough for a big bread, or divided it into two smaller loaves. You can also use just one part of the dough and put the rest in the fridge.
8
Don't work the dough, be gentle, cover it and let rise in a warm, draft-free place for 45 minutes.
9
Preheat oven to 225° C. With a sharp knife or razor, slash the top of the bread. This will help the bread to expand while is baking.
10
Another very important tip, for the first 10 minutes of baking place a small pan with boiling water inside your over. This will create humidity and improve the baking process.
11
Bake the bread for about 30-40 minutes.
12
Remove loaf to a wire rack to cool before slicing it.
Notes
Potete anche aumentare le dosi della ricetta per ottenere più impasto da cuocere man mano giorno per giorno durante la settimana.
EASY NO KNEADING BREAD WITH DRY YEAST
(No Ratings Yet)Ingredients
- 340 g lukewarm water
- 10 g active dry yeast
- 455 g di flour type "0" (bread flour is fine) W 240, Protein 12%
- 10 g salt
Instructions
Mix the yeast with lukewarm water (36°C) and whisk it with a fork.
Add flour and salt, mix well for about a minute. It is not necessary to work the dough or use a stand mixer.
You will obtain quite a rough dough but it is ok, there is no need to knead it.
Cover with plastic wrap and let rise in a warm place until doubled in size, about 2 hours. You can let it rise into the oven with only the light on.
Once doubled just put your container into the refrigerator for at least 24 hours. This dough can last for many days and it will become even better if you let is "rest" more time.
When you are ready to make your bread, just take the dough out of the fridge, flour your hands and gently shape the dough into a round ball.
You can use all the dough for a big bread, or divided it into two smaller loaves. You can also use just one part of the dough and put the rest in the fridge.
Don't work the dough, be gentle, cover it and let rise in a warm, draft-free place for 45 minutes.
Preheat oven to 225° C. With a sharp knife or razor, slash the top of the bread. This will help the bread to expand while is baking.
Another very important tip, for the first 10 minutes of baking place a small pan with boiling water inside your over. This will create humidity and improve the baking process.
Bake the bread for about 30-40 minutes.
Remove loaf to a wire rack to cool before slicing it.
Notes
Potete anche aumentare le dosi della ricetta per ottenere più impasto da cuocere man mano giorno per giorno durante la settimana.

No Comments